Home
Biography
Tables, Chairs
Cabinet Furniture
Beds, Built-ins, Other Work
Exhibitions, Galleries, News
Articles
Teaching and Student Work
Contact
Richard Jones Furniture
Joinery and Appearance Considerations in Solid Wood Panels,
Edge Joinery
When joining narrow boards to make up wider slabs the traditional approach is the plain edge or butt joint. This is a good place to start because it helps with understanding other methods. Like every joint, proper preparation means reduced risk of failure. The idea is to prepare two edges that abut perfectly all along the length so that no pressure is required to close a gap. In practice, this is difficult to achieve and most workers aim for a ‘sprung’ joint, figure 1, below.
Figure 1. The sprung joint. The gap is somewhat exaggerated here for clarity. When joining boards up to about 800 mm (32”) long the ideal gap at the mid-point should be about the same thickness as perhaps a very fine wood shaving. Longer edge joints tolerate a slightly wider gap. A gap like this will close with little or no more pressure than you’d need to hold something like a downward facing telephone directory with fingers and thumb either side of the spine.
The sprung joint has an evenly graduating gap produced that’s tight at the ends and widest at the centre point of the joint line. After preparation very gentle hand pressure should be enough to close up two adjacent boards. A method I quite frequently use to test if the joints are properly made is to close up the joints of several prepared boards laid edge to edge simultaneously with one centrally located cramp. If all the joints close fully on both faces and all points along the length the joints are good. In theory you could slacken the cramp, run glue along the prepared edges and finally glue up the panel. In the distant past I have done exactly this on occasion and got away with it, particularly if I was using hide or Scotch glues. This works because these glues are well known for their ability to glue assemblies using the 'rub joint', see below. I no longer follow this practice nor advise others to do so for there is a good chance the joint will fail due to insufficient application of pressure to the the full length of the joint. You might even end up with visible glue lines, a sure sign that the joint was not assembled tightly enough, and this is a good indication of probable joint failure in the future.
The sprung joint helps counteract the comparatively volatile width expansion and contraction of the last 50- 100 mm (2- 4”) of a plank’s length. The end grain of timber absorbs and gives up moisture the most rapidly. During glue up of the sprung joint, the ends are closed just a little tighter than the middle, and this helps to compensate for the disparate movement.
In addition to this, custom and practice, and my experience indicate that where the two joined edges are convex at glue-up the joint usually fails fairly quickly. In this situation bringing the edges together requires firm clamping pressure at both ends to close the gap. The joint will close, but both ends of the joint are under tensile stress and want to open up. As soon as a slight opening begins at the very extremity of the joint it’s my experience that serious failure soon follows—a gap anything up to a few inches long extending towards the middle of the length develops in just days. The worst case is complete failure of the joint.
The sprung joint on the other hand is much more durable. When formed correctly both ends of the joint should remain tight. Even with the greater volatility of expansion and contraction at the ends of a plank a gap doesn’t form. I use a zip as an analogy to explain what goes on. Close a zip and lock the tab at the end and the zip stays closed. Pull up the zip and leave the tag unlocked and the zip gradually opens.
The basic sprung edge joint provides the largest possible matching long grain glue surfaces. If we accept the premise that the strongest glue joint between two pieces of timber is long grain to long grain, then anything that reduces the maximisation of such a joint in table tops, panels etc, weakens it.
Adjoining boards in a table top can, and do, drift out of line in the thickness and form a step. Even the weight of a TV or computer monitor will do it with a foot placed next to a glue line and left in place for long enough. I have personal experience of just this occurring and in each case the glue used to make the joint was a PVA glue or the similar aliphatic resin emulsion type and these adhesives are notorious for their tendency to 'creep, see below for further discussion of this topic.
For the reason just described, and in many other situations, many woodworkers like to include an alignment aid or reinforcement of some kind into the basic sprung joint, eg, biscuits, dowels, loose tongue, finger joint, etc. They all reduce the strength of the plain edge joint, but compensate for this loss through increased glue line length and mechanical locking. The alignment aids and machined edge joints work best when the joined edges are as carefully and meticulously prepared as if doing a basic sprung edge joint.
There is yet another wood movement factor to consider in edge joinery. Water based glues such as PVA, hide glue, urea formaldehyde etc, all introduce water to the glue line. This water is very localised, but it does cause wood to swell creating a slight ridge at the line itself, perhaps no more than 6- 10 mm (1/4”- 3/8”) wide. If you glue up a panel with PVA glue at 9 am, take it out of the clamps at, say, 12 pm and immediately get to work preparing the panel for polishing, and actually follow up with polish you’re likely to encounter a problem. A week or two after polishing you’ll notice a slight furrow tracking every glue line.
If you’ve used a series of glued in biscuits to reinforce the joints it is likely you’ll see a slight furrow, and evenly spaced roughly elliptical shaped depressions that match the position of each biscuit. The chances are that you’ll get away with this error on vertical panel surfaces because there is often little or no light glancing off the visible face. But you won’t with table tops, and the glossier the polish the more the furrows and depressions stand out. Biscuits are manufactured of compressed beech wood, and they work in part by swelling with the water introduced during the gluing up procedure. This makes them fit tightly in the slot and can exacerbate any swelling caused by water alone.
Sufficient time is needed between introducing moisture to the wood causing it to swell, and preparation of the surface for polishing. The wood around the joint line needs two or three days to lose the added moisture and shrink down to match the level of the rest of the surface. I like to leave edge joined panels at least three days to settle, and a week is better still.
I have only discussed biscuits in this section, but similar considerations are required when using other edge joint reinforcement or alignment aids, eg, dowels or loose tongues. Non water based glues such as epoxy resin or polyurethane types don’t cause the same problems, but these types aren’t always appropriate for the job.
Storing a Panel Between Glue-Up and Use.
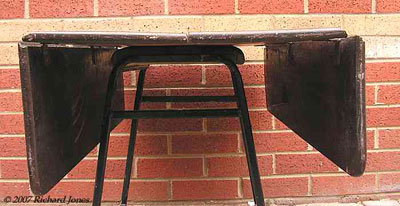 Photo1
A fairly common problem I see aired in woodworking forums and the question pages of both print and online woodworking magazines goes much as follows:
The scenario is that a woodworker has carefully edge jointed, glued, assembled and cramped up, and then put to one side a solid wood panel made of narrower planks. Whilst the glue fully cures, and to give the glued up panel time to settle, the woodworker continued with other tasks. On retrieving the panel the woodworker finds the panel is cupped across the width. The question is usually framed along the lines of, "What did I do wrong?", or, "Why did this happen?" The cupping is reported as being a single concavity towards one face of the panel no matter which way the end grain is arranged, see below. Photo 1 above illustrates the end result, although the cause of the cupping in this antique mahogany drop-leaf table top is due to another factor, ie, moisture cycling over a long period, a subject not covered in this discussion.
Further prompting of the questioner for the sequence of events usually reveals that the woodworker made up the panel and then laid it flat on their workbench or leaned the panel against a wall. The probable cause of the problem then becomes apparent. It is usually due to moisture uptake or moisture loss from one face and not the other. This occurs because one face is exposed to a change in atmospheric relative humidity (RH) and possibly significant temperature change, whilst the other face is not. For example, if the panel is rested directly on the top of a workbench, the face resting on the workbench is quite well protected from changes in RH whereas the exposed face is not. At the end of a work session if the heater or air-conditioning is turned off, and the workshop is not well climate controlled, this could lead to a quite rapid change in RH values and temperatures, and in both cases either upwards or downwards. The end result is that the upper exposed face of the panel either absorbs or loses moisture quite quickly. The sheltered face, the one resting on the workbench, does not, or does not to anywhere near the same extent.
In every case the effect is that the concave side is drier than than the convex side. Either the concave face has shrunk, or the damper face has expanded causing the panel to cup primarily across the width. The cupping can occur overnight or it might take a few days. The worst case scenario is a panel glued up and left for weeks, months, or even years and the cupping has had time to become set and therefore probably intractable as far as effecting a cure. If the cupping occurred overnight it is often possible to correct it by spreading damp wood shavings on a flat surface and laying the concave face over the shavings. The moisture transfers from the shavings to the concave face of the panel and it expands thus straightening the panel. A similar method is to lay the concave face on slightly damp grass on a warm sunny day. The sun dries out the convex face and moisture is added to the concave side. Yet another trick is to use a plant sprayer and spray some water on to the concave face to add moisture to the wood. There is no certain cure once the curve has developed, but I have found these tricks work quite often.
The real answer is to prevent this cupping happening in the first place, and the best way to do this is to ensure that air can get all around a glued up panel so that what affects one side affects the other side equally. This means laying the glued up panel on stickers on a flat surface so that the air can circulate and avoiding localised heat spots, eg, ensure the panel is not sitting directly underneath a heating panel or hot lights-- it is also a good idea to rotate the panel on the stickers from time to time. An alternative and equally effective approach is to seal the panel as tightly as possible after glue-up and the glue is properly cured. A good way to do this is to shrink wrap it in a plastic film so there is minimum contact between the panel and exterior conditions. If shrink wrapping is not possible, wrapping the panel in layers of plastic sheeting and sealing it as tightly as possible with tape works rather well.
End Grain Orientation and Panel Glue-Ups
At some point almost every woodworker faces the need to make up wide panels out of narrow timber. There are several good reasons for edge joining narrow boards to make wide slabs.- The selected timber is only available in narrow planks.
- The machinery available can only cope with modest sizes, assuming of course that stock is prepared with machinery rather than hand tools.
- It may be that cutting wide pieces into smaller sections and rearranging the order uses the grain more attractively.
- Edge joining narrow planks sometimes provides a means for controlling, predicting, and to some extent reducing the effects of warping.
- Preparing a long and/or wide board to a specified thickness might be impossible, ie, getting a warped piece flat where both sides are parallel leaves the material too thin for the job.
Some movement of joined panels will almost certainly happen due to variations in atmospheric relative humidity. This applies to both air and kiln dried timber.
How you should arrange the planks is often a subject for heated debate. I use all the layouts illustrated in figures, 2, 3 and 4 below, and my choice depends on the circumstance. For instance, the most attractive grain might all be on the heart side of tangentially cut boards, and if I’m making a table top I will use the material this way, ie, figure 3. For a table top arranged thus I usually incorporate a heavy slot screwed bearer on the underside. Similarly, if it’s a cabinet side that is housed across the grain (dadoed in the US) to accept a shelf or similar I often choose the same arrangement because then, at worst, I only have a wide cupped piece to hold flat on the workbench prior to running over it with the router. This is often preferable to dealing with a series of ripples. I tend to use the layout in Figure 2 most commonly when the strips are narrow, say 50 mm or less, or in cabinets where opposite cabinet sides are linked with tenoned or dovetailed rails.
It’s also a useful option to try and arrange all the grain so that it rises towards one end when viewing the panel from the narrow edge, although this is often not possible because the grain orientation varies so much. If successfully achieved, this results in reduced tear-out when planing the final glue up, whether by hand or machine, ie, you can plane in one direction without tearout. Sometimes sacrificing this consideration over appearance is a valid choice.
Wide Boards
There is always the thorny issue of what to do with very wide planks. Should they be ripped into narrower strips and re-glued, or left as one whole piece? I’ve never found any hard and fast rules that suits every case. The nature of the job determines the decision. Take, for example, a very wide plank, say 20” (500 mm) wide with striking grain pattern and other figuring, perhaps kiln dried to 7% or 10%. If it’s remained stable and flat during storage since in RH varying between about 40% and 60% there is no particular reason to think it will become unstable as a furniture part and put into service in a typical house. With suitable cross bracing and means to hold it flat in the structure a viable choice might be to keep it whole. Without large machinery to do the flattening and squaring this decision could result in a lot of hand work with planes, but hand work is sometimes very much worth the effort.Where I have to join up narrow planks to make up wider panels I tend to use random widths. I willingly glue up stuff 175 mm (7”) wide and wider if I am able to incorporate suitable bracing. However, if I decide that I want the boards to be around, for example, 80 mm (3-1/8”) wide each, I try to make them all no more than about 10 mm (3/8”) either side of this figure, i.e., 70-90 mm wide (2-3/4” to 3-1/2”). This tactic prevents just one board standing out as markedly different from the rest, and I happen to like a little irregularity anyway.
There are times when I machine stuff all to exactly the same width. This applies particularly when making a cabinet in which the top does not overhang the side to disguise any offset joint lines. Offset panel edge joint lines that run around the side to the top, and back down the other side in a cabinet with, for example, mitred corners are usually visually disconcerting.
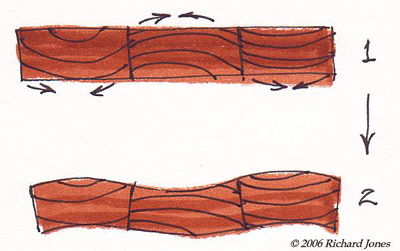 Figure 2
Joining what are known as tangentially sawn, plain sawn, or flat sawn planks with the end grain arranged as at 1 (right) results in a washboard effect as at 2 which is an exaggerated approximation.
The arrows in figures 2, 3 and 4 indicate the direction of greatest shrinkage as wood dries, ie it follows the circumferential arc of the growth rings.
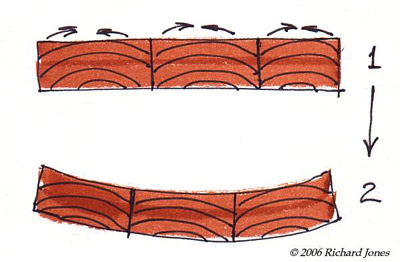 Figure 3
 Cupping of panel in one direction due to arranging the bark side of the growth rings all towards one face.
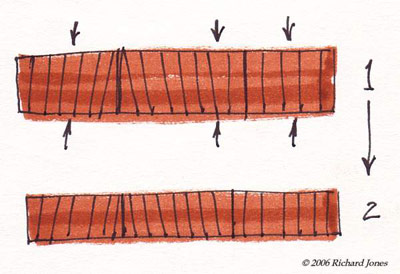 Figure 4
Joining quarter sawn planks to make up a panel. Typical movement in quarter sawn stock is that the material merely becomes a little thinner because of the even shrinkage experienced. Little cupping or washboarding is likely.
Chatoyance Considerations
When deciding the arrangement of boards there is yet another factor to consider, and in this case its relevance centres around how wood takes polish, which then refracts and reflects the light that hits the surface. Chatoyant comes from the French and means to shimmer, to describe iridescence, or a changeable lustre; woodworkers commonly use the term ‘chatoyance’ to describes the different appearance of a polished piece of wood when viewed from different angles. It’s especially noticeable in woods with striking figuring, eg, the silver grain of quarter sawn European oak, ‘fiddleback’ maple and ‘quilted’ maple. The appearance of polished wood depends upon which way the numerous severed fibrous tubular vascular tissues of a board intersect the wood surface, and how light behaves as it passes through the polish and is reflected and refracted back towards the viewer, see photos 2 and 3 below.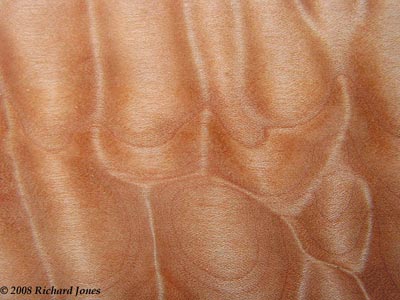 Photo 2
 Photos 2 and 3, right. From different angles quilted maple takes on quite different appearance and even different colour characteristics.
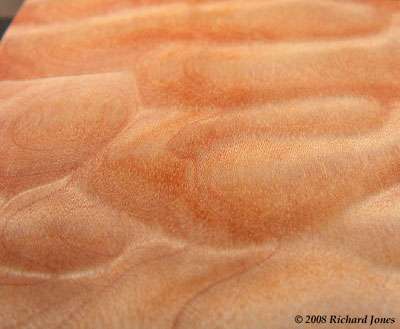 Photo 3
A good analogy to describe these reflective and refractive properties is to think of a short, but shiny furred pet. Look at the fur with the hair tips all pointing away from you and the pet’s coat seems smooth and glossy: from the other direction, that is, with the end of each hair pointing towards you the coat seems rougher with a lower sheen. This explains why the stiles and rails of frames all polished exactly the same look different. The rails may look lighter than the stiles, or visa-versa. Turn the frame through 90º and the light and dark members reverse. Similarly, examine something like a polished five plank solid wood table top from one end and three boards might look light and two boards dark. Turn the table top through 180 degrees and you’ll almost certainly notice that the two dark boards are now light, and the three lighter boards are dark.
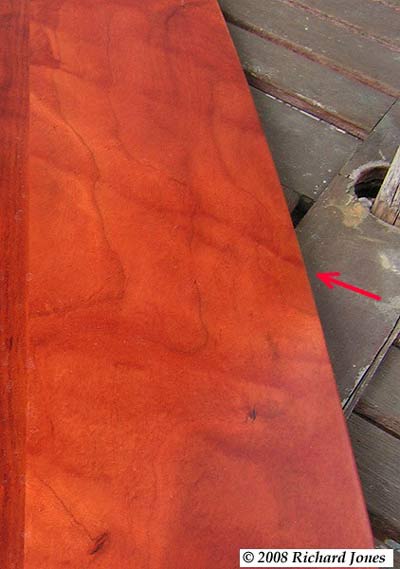
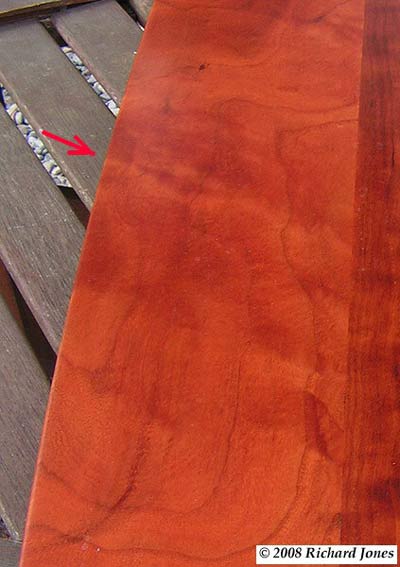
All this discussion and the image samples here suggest there are times when it’s important to try and account for how the assembled and polished panel will look. Will there be dark and light patches? Will just one plank in your proposed arrangement stand out as light and shiny whilst the others are dark? Turn the arrangement around through 180º and will that same plank look dark whilst the others appear lighter and shinier? Similar issues arise when dealing with figures with descriptions such as quilted, pommele and fiddleback, and the same questions occur with veneers. In the case of veneers there are bookmatch patterns, quartered, reverse quartered and diamond patterns, etc. How will they look when the polish finishes the job off? One method to get some idea of the appearance of the end result is to wet the surface of the wood or veneer with a solvent such as alcohol or white spirits, aka, mineral spirits as these technique often reveal, or at least partially indicate the likely final appearance.
Photo 4
Photo 5
| Side Bar 1 - Rub Joints and Cramping Pressure Scotch glue, aka hide glue is made of the gelatinous like material found in animal skin, bones, connective tissue, tendons, etc. Manufacture of the glue is through prolonged boiling of these tissues until the 'brew' forms the essential gelatinous liquid; it is then dried and sold as pearls, blocks or cake. To use the glue it is softened in water and heated until it is thin enough to spread with a brush.. Rub joints are a traditional joint that utilises one of the properties of Scotch or hide glues. Joints are put together by applying glue to one or both parts of the mating faces and rubbing the two parts together until the glue starts to 'grab'. At this point the assembly is left alone to set. This works in solid wood panel edge joinery, fitting corner blocks to chairs, the application of mouldings to furniture, etc. If the technique is used in solid wood panel glue ups I like to also use a few sash cramps. I set them up ready for use, do the rub joint and, after a few minutes, apply the cramps and tighten them up. I do this because as the glue and wood either side of the joint dries it loses moisture and the joints can end up microscopically 'gappy'. The cramps ensure the joint lines are tight and gap free. Modern adhesives undergo numerous scientific tests, as for that matter do modern formulations of traditional woodworker's glues such as Scotch or hide glue. Contemporary manufacturers of modern glues or adhesives recommend cramping pressures for their glues at assembly. For example, Franklin International, manufacturers of Titebond woodworking adhesives including aliphatic resin emulsion glue, recommend a cramping pressure of 100 lbs per square inch for softwoods, and up to 250 lbs per square inch for hardwoods. The lesson for us woodworkers is that we should cramp up solid wood panels with a sash cramp set roughly 50 mm in from each end of a panel with the rest of the cramps spaced approximately 150- 200 mm (6"- 8") apart, and alternate the cramps on the bottom face and the top face of the assembly, eg, three cramps on the bottom face and two on the top of a panel that is roughly 700 mm (28") long. Alternating the cramps top and bottom helps counteract the panel bowing that cramps set all to one side cause. Additionally we should tighten the cramps as tightly as we reasonably can by hand to achieve the required pressure. Is this tight enough? It is unlikely that a woodworker can exactly match the cramping pressure recommended by the manufacturer, but if you tighten up the toggles or bars on the cramp heads firmly as just described it seems unlikely to me that the recommended pressures will be exceeded. |
| Side Bar 2-- Glue Creep in PVA type glues. Creep. Some glues remain slightly elastic even after their full cure. Polyvinyl acetate (PVA) glue and the similar aliphatic resin emulsion formulations are well known ‘creepers’. Under stress the glue line gives and parts move out of alignment. For example, bent wood laminations glued with PVA tend to straighten out long after their removal from the bending form. Where the bend is slight and the stress on the glue line is also similarly small the springback and long term creeping is often insignificant. Severe bends where stress occurs in both the glue line and within laminations themselves show greater tendency to ‘springback’ or straighten. Another form of creep involves moisture cycling, again with PVA and aliphatic resin emulsions. In this second version both the wood and the glue in a joint swell as they take on moisture. The wood later shrinks as it dries but the glue doesn’t and sits above the joint line. Where this happens to a solid wood glued up table top the result is a line of small pimples along the glue line that is just perceptible to the finger tips although, quite often, the pimples are also visible. I’ve occasionally seen the ‘row of pimples’ fault where rather wet planks, 13% MC or so, were edge joined to make a panel which later shrank as the wood adapted to internal house conditions by drying to roughly 8% MC. Glues that never really cure hard and always remain a little elastic allow a little movement in the joint. PVA glues do sometimes let adjacent planks shift a little as the seasons change. |
Home Biography Tables, Chairs Cabinet Furniture Beds, Built-ins, Other Work Exhibitions, Galleries, News
Articles Teaching and Student Work
Contact
Articles Teaching and Student Work
Contact
© 2017 Richard Jones