Home
Biography
Tables, Chairs
Cabinet Furniture
Beds, Built-ins, Other Work
Exhibitions, Galleries, News
Articles
Teaching and Student Work
Contact
Richard Jones Furniture
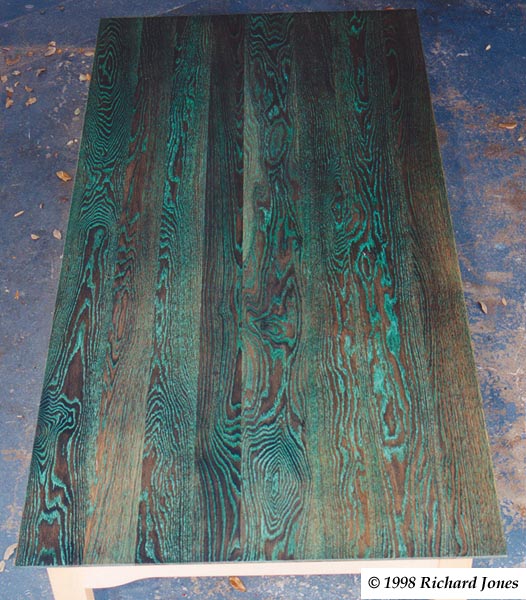
An Unusual Polishing Technique for Open Grained Woods. Richard Jones © 2012
 The
polishing of the table top to achieve the effect seen
here used a chemical that reacted with natural extractives found in the
wood
and other chemicals found in water. The later finishing stages used
tinted Plaster of Paris with the panel finally sealed with lacquer, see
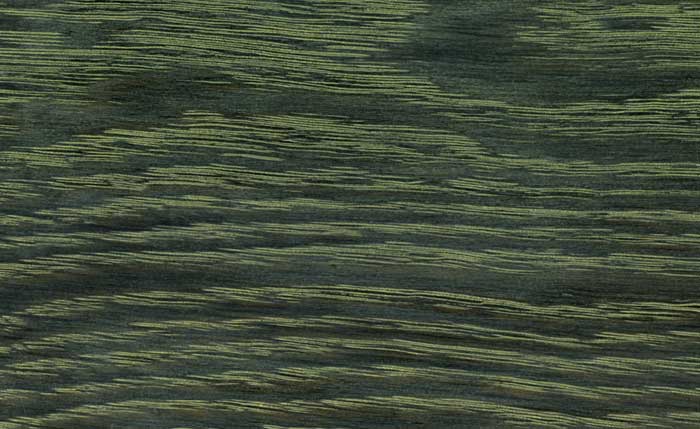
photograph beside
this text. The blue grey background colour comes from the chemical
reaction of
the tannin in the white oak wood with water and green copperas, AKA
ferrous
sulphate which is the chemical dye. Ferrous sulphate reacts in a similar way
with maples and European sycamore to produce what is known as harewood or greywood, with more images of harewood at the Tweed Table page, as well as an example of the result near the bottom of this page. In the case of the maples, not known for their
high tannin content, I am not sure what the ferrous sulphate reacts
with, but it certainly works.
The
polishing of the table top to achieve the effect seen
here used a chemical that reacted with natural extractives found in the
wood
and other chemicals found in water. The later finishing stages used
tinted Plaster of Paris with the panel finally sealed with lacquer, see
photograph beside
this text. The blue grey background colour comes from the chemical
reaction of
the tannin in the white oak wood with water and green copperas, AKA
ferrous
sulphate which is the chemical dye. Ferrous sulphate reacts in a similar way
with maples and European sycamore to produce what is known as harewood or greywood, with more images of harewood at the Tweed Table page, as well as an example of the result near the bottom of this page. In the case of the maples, not known for their
high tannin content, I am not sure what the ferrous sulphate reacts
with, but it certainly works.To achieve a similar result you start by raising the grain of the wood by wiping the surface over with hot water applied with a clean lint free cotton cloth. Let the wood dry thoroughly and sand back the raised grain lightly with 220 or 240 grit abrasive paper, then brush off or blow off the surface dust.
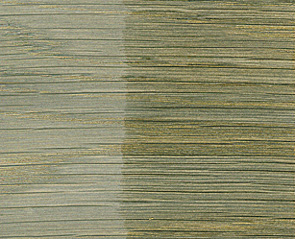 Mix the pale green ferrous sulphate powder with water into a
muddy green-brown solution. To get a result much as at right which is ferrous sulphate on English oak,
good base proportions around which to adjust the strength later is one
heaped teaspoonful of ferrous sulphate per half a litre of water (or
one pint if you prefer to work in either Imperial or American measure);
some people say you should use distilled water, but I have never used
it in my concoctions. If you look closely at the sample to the right
you can see the solution hasn't penetrated entirely
successfully into the bottom of the open pores because the brown
of the wood shows somewhat. A way to help penetration of water based
dyes and colourants is to add two or three drops of dish-washing soap to
the mix. This reduces the surface tension of the water, discourages
'bridging' over pores, and helps it flow better into those pores
and crevices. The sample shown at right had a little shellac
applied to the right hand side, and remained unpolished on the left. In
use the solution needs regular stirring, easily done with the brush
used to apply it to the wood. Apply it quickly with
the grain, preferably with a brush for large surfaces, but a cloth also
works
well. Keep the solution wet and flooded on the wood for three to five
minutes
and wipe off the excess liquid, again with the grain, using dry cotton
rags or
paper towels. The colour gradually appears as the wood dries.
Mix the pale green ferrous sulphate powder with water into a
muddy green-brown solution. To get a result much as at right which is ferrous sulphate on English oak,
good base proportions around which to adjust the strength later is one
heaped teaspoonful of ferrous sulphate per half a litre of water (or
one pint if you prefer to work in either Imperial or American measure);
some people say you should use distilled water, but I have never used
it in my concoctions. If you look closely at the sample to the right
you can see the solution hasn't penetrated entirely
successfully into the bottom of the open pores because the brown
of the wood shows somewhat. A way to help penetration of water based
dyes and colourants is to add two or three drops of dish-washing soap to
the mix. This reduces the surface tension of the water, discourages
'bridging' over pores, and helps it flow better into those pores
and crevices. The sample shown at right had a little shellac
applied to the right hand side, and remained unpolished on the left. In
use the solution needs regular stirring, easily done with the brush
used to apply it to the wood. Apply it quickly with
the grain, preferably with a brush for large surfaces, but a cloth also
works
well. Keep the solution wet and flooded on the wood for three to five
minutes
and wipe off the excess liquid, again with the grain, using dry cotton
rags or
paper towels. The colour gradually appears as the wood dries.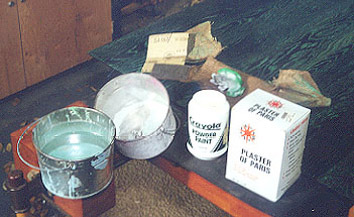 Apply a thin barrier coat of a film forming polish over the
dyed wood, eg, shellac, varnish or lacquer. I used a thinned out sprayed
pre-catalysed lacquer on this table top. This seals the background colour off from
the subsequent grain filling. This is important for the look required here because
without the barrier the grain filling colourants alter the background colour as
well as filling the open grain of the oak.
Apply a thin barrier coat of a film forming polish over the
dyed wood, eg, shellac, varnish or lacquer. I used a thinned out sprayed
pre-catalysed lacquer on this table top. This seals the background colour off from
the subsequent grain filling. This is important for the look required here because
without the barrier the grain filling colourants alter the background colour as
well as filling the open grain of the oak. Filling the grain using Plaster of Paris is the next task. Put some Plaster of Paris in a bucket and add a little dry powder colourant. I used green powder paint and mixed it in-- about one heaped teaspoon of paint per four or six heaped tablespoons of Plaster of Paris is a good place to start for experimenting with colour intensity.
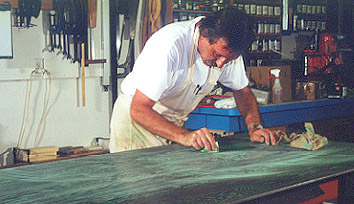
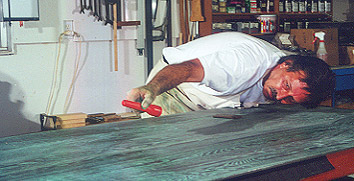
Use a cotton cloth, dip it in some water, pick up a little of the powder mix and scrub the plaster of paris across the grain in a roughly elliptical motion to force the damp powder into the pores of the wood. Working in sections about one foot square keep dipping the cloth in water and picking up more dry powder mix. With an approximate one foot square section done grab a piece of rough hessian -- burlap to North Americans, and vigorously scrub off the Plaster of Paris sitting on the surface of the wood, mostly by working across the grain. I finish off this bit of the job by more gently working the hessian with the grain. This removes the cross grain striations that develop in the earlier part of removing excess filler.
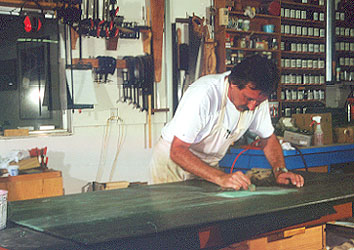
Go over the whole panel in small sections as just described and leave the filler dry, preferably overnight. Quite often a second application is needed, and that was the case with this job because I'd missed patches here and there. After the second application the panel was left to dry and sanded very lightly with the grain using 220 grit paper to remove the last of any cross grain marks. Two coats of pre-catalysed lacquer completed the job.
Grain filling with a contrasting colour as seen here is a little unusual. Most grain filling is done with the intention of blending with the background colour, and of course to create a level surface in an open grained or 'coarse' wood; contemporary wood finishers mostly use convenient ready mixed grain or pore fillers out of a can. Using Plaster of Paris is an old technique, and it is not commonly seen today, in part I think because many workers in the past probably didn't use some sort of pigment or other colorant in their mix, with the result that the Plaster of Paris tended to reveal its whiteness after time, often years or decades later. But it remains an effective and valid method for achieving either a fully filled or ‘semi-filled’, AKA a ‘half-filled’ surface if used appropriately.
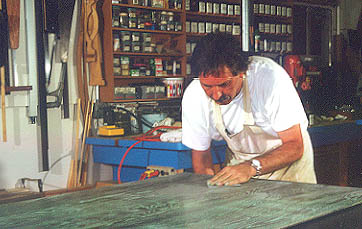
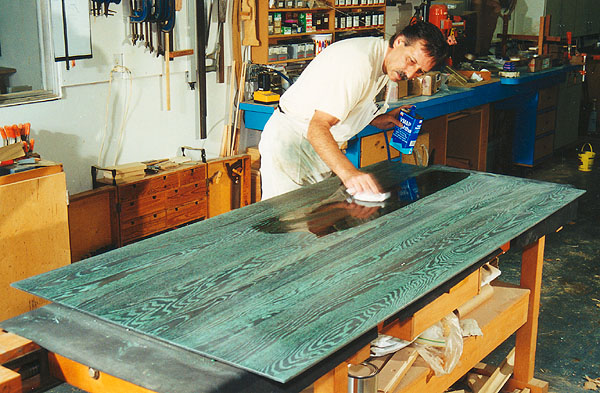
Above. Final light sanding with the grain, top left. Checking the grain is properly filled using naphtha, upper right, and a low angled flashlight used to glance light off the surface, bottom left.
Below: Tweed Table. More images of this table can be found here.

To achieve a somewhat different effect rather like liming you can use water based wall paint sold as emulsion paint in the UK, and commonly known as latex paints in North America. In the example below, which is American white oak, the background dark ebonised appearance was achieved much as above using a quite strong ferrous sulphate solution. This was followed up with a similar light spray applied barrier coat of pre-catalysed lacquer. After the lacquer dried a pale green emulsion (latex) paint was quickly brushed on. Whilst this paint was still wet it was wiped off, mostly across the grain, with coarse cloths, although some wiping with the grain was required. This leaves paint in the open pores of the wood. Again, the paint was given time to dry and a follow up with fine abrasive paper worked with the grain finished this part of the job. The last stage was two applications of pre-catalysed lacquer as per normal. In this case the paint is used only to provide a colour contrast through the fact that wood has a coarse open texture which conveniently creates somewhere for the paint to lodge. Although it does fill the grain, up to a point, it's not intended to act as a true grain filler that creates a permanent level surface. There is, for example, a strong likelihood that the paint will shrink down into the open pores or grain somewhat over time, which is an undesirable characteristic if the purpose is to fill the grain. If that is the intention, then using a proper grain filler is the right choice, not paint.
The end result you achieve depends on the desired final appearance. You could, for example, apply the paint to bare wood prior to wiping it off-- this means the paint will not only go into the coarser spring grown open pores of the wood but will also tend to colour the finer textured summer grown wood. You could also omit any form of dying or staining to change the background colour of the wood, but you do apply a barrier coat of film forming polish as described earlier to concentrate the applied paint (in your preferred colour) in the open pores. Naturally, all the treatments described on this page generally work best on coarse textured or medium textured woods. I personally think they work best of all on ring porous woods such as oak, ash, elm, chestnut, and so on.
Home Biography Tables, Chairs Cabinet Furniture Beds, Built-ins, Other Work Exhibitions, Galleries, News Articles Teaching and Student Work
Contact
Contact
© 2017 Richard Jones