Home
Biography
Tables, Chairs
Cabinet Furniture
Beds, Built-ins, Other Work
Exhibitions, Galleries, News
Articles
Teaching and Student Work
Contact
Richard Jones Furniture
Flattening Veneer by Richard Jones © 2009
When to Flatten Veneer
Not all veneers are tame, flat, compliant and ready to stick down to a prepared groundwork. Some are rippled, cupped, gnarly and quite contrary with large furrows and ridges in them. Burl veneers, birds-eye and crotch veneers are good examples that frequently display these tendencies.
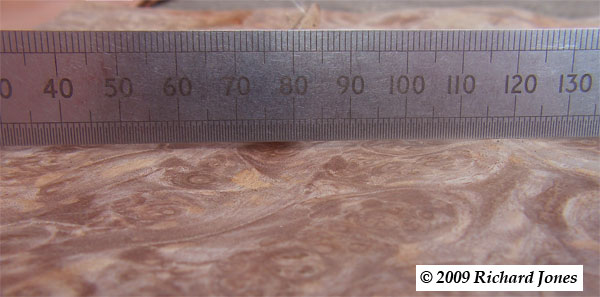
Right. This rippled American black walnut burl veneer requires flattening prior to edge jointing and laying.
How do you decide if the veneer requires flattening before you lay it? I use a selection of techniques. The first method is to find a rectangular piece of MDF 9 or 12 mm thick that measures roughly 120– 150 X 80– 100 mm (about 5” X 4”) and rest it on the rippled veneer leaf. If there are gaps between the high spots greater than about 4 mm (3/16”) it is likely the veneer needs flattening before you try and join together
 straight cut edges to make up patterned panels or stick the veneer
down. A second method is to simply hold the edge of a 150 mm (6”) rule
across the grain and with the grain and look for the same sort of gap.
Thirdly, simply pressing down gently with three or four bunched
together fingertips on a bubble or ripple to see what effect this has
on the surrounding veneer leaf gives you a good idea of the likely
result of gluing the veneer down. If pressing down like this causes the
surrounding veneer to deform and move about this veneer can’t be
satisfactorily edge joined to make up patterns. Yet another method is
simply squashing the veneer between a couple of flat surfaces. I've
used everything from a workbench top to a table saw top and laid a
piece of ply or MDF over the veneer. Crunching noises, and ripping or
snapping noises are a giveaway indicating that flattening is likely to
make life easier for both creating neat cut jointed edges and for
laying down at the glue-up time.
straight cut edges to make up patterned panels or stick the veneer
down. A second method is to simply hold the edge of a 150 mm (6”) rule
across the grain and with the grain and look for the same sort of gap.
Thirdly, simply pressing down gently with three or four bunched
together fingertips on a bubble or ripple to see what effect this has
on the surrounding veneer leaf gives you a good idea of the likely
result of gluing the veneer down. If pressing down like this causes the
surrounding veneer to deform and move about this veneer can’t be
satisfactorily edge joined to make up patterns. Yet another method is
simply squashing the veneer between a couple of flat surfaces. I've
used everything from a workbench top to a table saw top and laid a
piece of ply or MDF over the veneer. Crunching noises, and ripping or
snapping noises are a giveaway indicating that flattening is likely to
make life easier for both creating neat cut jointed edges and for
laying down at the glue-up time.Above right. Using finger tips to check for the effect on the surrounding of pressing down on ripples.
It’s also likely that as the veneer is laid, using whatever method you prefer, will cause the bubbles to deform, crack and overlay one another. It is a little like trying to wrap a piece of paper around a rugby ball or a football— it has to crease and deform to do so.
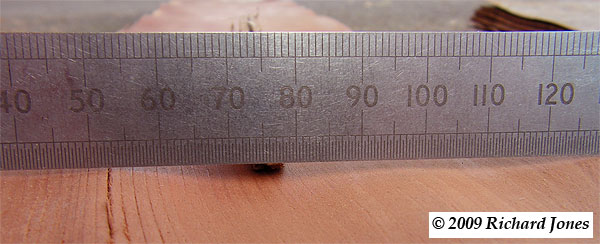
Right. A single gently cupped gap shows below the rule but this piece of yew veneer will lay flat without problems.
Flattening Recipes and Methods
Once you have decided that your veneer needs flattening choose one of the following recipes. In both cases the proportions are by volume:Recipe 1
- 2 parts PVA glue (or hide glue, hot or cold type)
- 3 parts water
- 1 part glycerine
- 1 part industrial alcohol (aka meths in the UK and as denatured alcohol in North America).
Recipe 2
- 2 parts powdered white urea formaldehyde glue, aka Cascamite in the UK
- 1 part strong wheat flour, but not a self raising type
- 3 parts water
- 1.5 parts glycerine
- 1 part industrial alcohol
Whichever recipe you’ve chosen mix all the components together thoroughly and apply to both sides of the veneer liberally using a brush, a plant mister or by soaking the leaves in a shallow plastic tray. Let the veneers soak for five or ten minutes then hang them up until the majority of the liquid has run off and the veneers are damp.
Place veneer between layers of thin mesh plastic or fibreglass mesh (gardening centres are a good source of suitable plastic) and add 2-3 layers of blank newsprint on top of the mesh; decorators plain white lining paper is an alternative. Blank newsprint is preferable to printed newspaper, although this will also do the job, but with a tendency to transfer ink to the veneer, especially noticeable on pale veneers. Fibreglass mesh works well as a separator to prevent the glue sticking the paper to the veneer. Add more newspaper, mesh, veneer, etc, stacking as high as you like.
Place this “sandwich” in a vacuum press (bag) with a caul on top that is at least 6 mm or 1/4” thick and apply full pressure. If you don’t have a vacuum bag, or if the veneers are very badly buckled and likely to crack if flattened too quickly, put chipboard (particle board) top and bottom and weigh the stack down with anything heavy—sandbags and weightlifters weights are possible options for instance, and gradually increase the weight over the course of a day or so.
Change the paper 2-3 times the first day and leave weighed down or under pressure overnight. On the second day remove the sandwich from the press or from under the weighed down top layer of chipboard, and take away the plastic or fibreglass mesh as it is no longer needed because the veneer will not stick to the newspaper anymore.
Change the newspaper 2-3 times on this second day but do not put the sandwich in the press, just place weight on top of the caul to hold the stack down. It’s easy to think this second day is unnecessary since the veneer by this stage should be fairly dry but it is not dry enough to press. This extra day is important for good final results.
On the third day the veneer is ready to use. If you do not use it immediately the veneer will stay flat for months provided a board is placed on top of the veneer stack, and light pressure applied over the top. Newspaper between the veneer is unnecessary at this point, but you can separate out the layers of veneer with layers of plastic instead. Plastic sheeting between the veneer layers does help reduce the exchange of moisture in and out of them preventing too much drying out and cracking.
Veneers in any case should not be kept in low conditions of Relative Humidity (RH.) 40%RH is too low equating to the wood, ie, the veneer, eventually reaching about 7.5%MC (Moisture Content). 60% to 70% RH is good as this means wood will settle out at 11.5%- 13.5%MC. The flattening method just described is a good way to flatten veneers for storage. The glue added to the solution will keep the veneers flat for a long time. As well as interleaving the veneer leaves with plastic sheeting for long term storage many workers find it useful to completely seal the veneer flitch in tightly closed plastic bags or wrapped in sealed plastic sheeting. This helps prevent changes in RH affecting the MC of the veneers.
If you have a heated press, either hydraulic or vacuum type the whole flattening job can be foreshortened to between an hour or less and up to four or six hours.
Flattening veneer for immediate use.
For a fairly quick veneer flattening job start by mixing an approximate 1:8 proportion of glycerine (1) and water (8.)Spray the mixture on both sides of the veneer with a plant mister and wait for a few minutes to let it soak in. Then place individual sheets of veneer between double sheets of newsprint and weight them down or press them between waxed or polished chipboard cauls. Change the paper every 24 hours.
The veneer should be flat, soft and ready to glue up in a day or two if you're gluing the veneer down with PVA, hide glue, or other water based adhesive. If you're using epoxy or something that might not bond if there is too much moisture in the veneer, keep doing the newspaper routine until the veneer is down to the target MC. If you have a heated hydraulic press the process should take much less time, as before, eg, only an hour or two to complete rather than a couple of days.
I've heard suggestions to add a little hide glue to the glycerine solution, but my experience is that the glycerine and water mix softens and flattens the veneer ready for immediate use. Adding glue makes this recipe much the same as the one I provided earlier, and that recipe uses the glue to hold the veneer flat for long term storage and later use.
Home Biography Tables, Chairs Cabinet Furniture Beds, Built-ins, Other Work Exhibitions, Galleries, News Articles Teaching and Student Work
Contact
Contact
© 2017 Richard Jones